I missed sending a couple of really important birthday cards this month. I'm always late, but at least this time they'll be sent in the same month! LOL!
This one is for our dear friend "Sam" who now lives far away from us. He's 4 this year, so I wanted to make a "FUN" card for him. I decided to go with a pop up card.

Those little pinwheels on top are so cute, aren't they? You could do pinwheels on every layer if you wanted to. I got off easy since Sam is only 4!
Important! Complete the outside cover of the card before you glue the pop up cake insert into the card. Once the insert is glued, the card is bulky and uneven and difficult to work with. You'll appreciate this tip, trust me.
(click on the photos to see a larger view) So here's how you do it:
Your card inside should be cut to 8 1/4 by 5 1/4 inches, then folded in half. With the fold against the top of the trimmer, make 4 cuts. the first one is shown above. With the top edge of the card at the 1 1/8" mark on the trimmer and the fold at the top of the trimmer, press the blade down and cut till the pointer in the center of the blade handle reaches the 1 inch mark on the blade guide. Push the blade back up to its starting position to make sure you've cut through both thicknesses. Do this for each cut you make. Do not remove the card from the trimmer, just continue to move it up to each new position until all 4 cuts are made.
For the second cut, move the card up to the 1 7/8" mark and cut to the 1 1/2" mark on the blade guide.
For the third cut, move the card up to the 2 7/8" mark and cut to the 2" mark on the blade guide.
For the fourth cut, move the card up to the 3 7/8" mark and cut to the 2 " mark again on the blade guide.
Place the card in your Simply Scored Tool and score from the end of the cut line down to the next cut line as shown in the photo above.
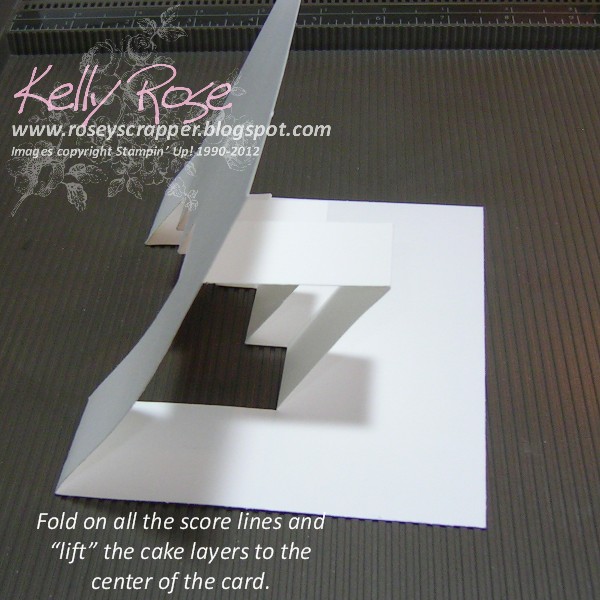
Fold on all the creases and fold the cake parts into the center of the card as shown above.
From the back it should look like this (photo above).
You will need 3 strips of paper to cover your cake layers: 1 x 4", 1 x 3", and 3/4 x 2" (shown above)
Fold and crease each of these strips in half with your bone folder and glue to the cake layers of the card. I don't know why I didn't take a picture of that step.
When you're ready to put the card together, glue the back of the card insert, one side at a time to the card base.
Glue the second side down. When you glue the second side, fold the card shut to adhere. You do this to make sure your card will shut when it's finished.
And here's my card front. CUTE stamp set!! I recommend you use the Stamp A Ma Jig because I didn't and my cake looks a bit lop-sided.
There is a printable version of this tutorial in my
tutorials page.
If you need any of the supplies to make a card like this one, you can find everything you need in my Stampin' Up! Online Store HERE.
I'd love to see your pop up birthday cakes if you make one! Tomorrow I'll show you the card I made for "Sam's" mommy with a stamp set I got at #Convention 2012.
Til later, and may God bless you abundantly,
Kelly
Stampin' Up! Supplies used:
Stamp Sets: Make a Cake (#126740 wood, #126742 clear mount), Word Play (#120308 wood, #120651 clear mount)
Ink: Midnight Muse(#126860), Primrose Petals (#126858), Summer Starfruit (#126991)
Paper: Patio Party Designer series paper (#126916), Whisper white (#100730), Primrose Petals (#126841), Midnight Muse (#126843)
Tools: Simply Scored (#122334), Paper Trimmer (#126889), Bone Folder (#102300), 1 3/4" Circle punch (#119850), 2 3/8" Scallop Circle punch (#118874), Multipurpose liquid glue (#110755)
Accessories: no accessories? can you even believe that?
If you don't have a new catalog yet, you can buy one here and I'll send one out right away along with a lovely thank you card.
Stampin' Up! 2012-2013
Catalog $7.00 (no paypal account required to pay via paypal)
Shipping via Priority 2-3 day mail.


love this! This is my first attempt at a pop up card and I must have moved my trimmer just a little too far because when closed my bottom layer sticks out just a tad on my cake but I think it will be great for my sample board for open house! This is my first month as a demo and I want to thank you and everyone else for the easy to follow instructions and things that help make it so much easier. I got the patio party and make a cake sets but had not used them yet. I cased your card almost completely and put it on my blog with a link back to yours
ReplyDelete